Showing posts with label Sewing. Show all posts

Friday, October 28, 2011

Weekend Links : The Alphabet


The alphabet, she inspires me.
And even though I have a leg up in that department, here are a few prime ways for everyone to have fun with all 26 letters.


Small fabric scraps can be used make a fabric alphabet, which is not only a fun learning toy (I love these big letters for toddlers, or smaller, magnetic ones for new spellers), but the letters can also be clipped to a ribbon and used for a birthday banner or bedroom name bunting.


You could also make a leaf alphabet. It's just about the perfect craft right now if you live somewhere with changing leaves. I have always appreciated creative alphabet books, and this project reminds me of Eric Carle.


Another thing that might be fun to attempt on your own, Garret Steider created a food alphabet, with prints available to decorate your kitchen and entertain your guests.


If you aren't in a crafty mood, but would still love to decorate with letters, whip out the cardstock and try these well designed free printables!


Finally, this fantastic alphabet montage might just shoot creativity straight into your mind.


More alphabet fun:
homemade alphabet pretzels 
 food alphabet on etsy
animal alphabet on etsy
whimsical German alphabet on etsy

(And if you're in the mood for reminiscing, why not watch everyone's favorite giant yellow bird being ridiculous? If you didn't watch Sesame Street as a child, this video is a very important part of your cultural education.)

Thursday, March 17, 2011

Button Pouch Tutorial


For the Button Pouch I made for Lucy, I chose two vintage grain-bag fabrics a friend had given me, and I went back and forth with the purple plaid, and whether I should applique an elephant on the front. 
"Purple elephant or no purple elephant...purple elephant or no purple elephant?" 
In the end I opted for something a little more subtle.

Tuesday, March 8, 2011

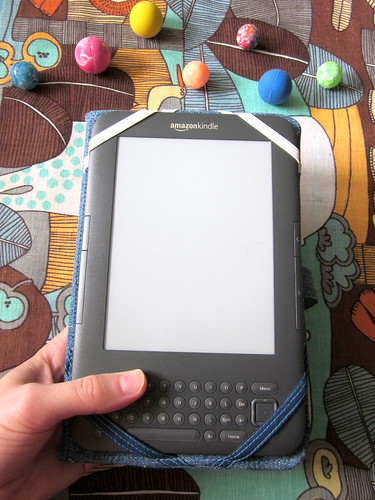
Blue Jean Kindle Cover Tutorial


     Some of you (especially those of you who know that my frugality borders on stingy) may have read that title, and said,"Wait a minute. She has a kindle?"
Yes. It's true. But for the story on that, you're going to have to wait until the end of this post...mainly because I want you to scroll past the pictures and see the transformation of a few pieces of discarded blue jeans and cutting board into a kindle cover (I apologize for the florescent lighting...but most of my inspiration happens after sundown. Ignore the frequently changing colors..I did try to adjust them believe it or not). I also saved it until last because the story involves some videos, and those will be at the end.

     As for the cover, I really wanted to make one because most of the ones out there are either really expensive or completely synthetic. I wanted something that would last, and would be durable and thick enough to protect the screen, but streamlined, not bulky or floppy. I wanted something that I could shake (whether open or closed) and the kindle would still be held tightly.

     I thought it would be a good project to utilize my neglected denim collection, so I came up with a sketch. And even though I changed a few things, I'm happy with how closely I ended up sticking to it. I should sketch my projects more often.


Wednesday, February 23, 2011

I made some things.

Yesterday Nathanael and I went out to the garden to finish up some things we hadn't had the chance to complete during our busy Saturday. We made a few new rows, but it has been to dry to break the soil appropriately for planting (i.e. the soil is concrete), so I was writing some seed names on stakes, which required me to reference the seeds. About then, Nathanael and I both realized our seeds were just too disorganized. As you can see below, they were neither functional or manageable, but more or less in two large piles (though not spilling during transportation, which is a plus).


Thus, I decided that today's project would be solving this problem. I got a box (one of many from our move and the packages we receive from family), tore all of the labels off of it and went to work. As you may begin to notice, I never actually use scrapbooking paper for creating scrapbooks, but I love to use it to decorate. After adorning the box I used some cardstock (leftover from creating our wedding invitations believe it or not--though we only used the yellow for that) to create tabs, and voila! A recipe-box-like seed organizer.


Nathanael and I are both pretty excited about how much easier this will make our planting times. 

Also this week, I decided to make use of some of the blue jeans I have been collecting and make a thick, durable potholder. Nathanael's old black Singer sewing machine is pretty powerful to make it through all of these layers! Some parts of it required some seam-ripping and redesigning as I went, but I am pretty happy with the finished product and it is now listed in my shop. (See link at top left for shop listing and larger versions of the potholder pictures.)


 And finally, remember the rice bags I made at Christmas time? One of my friends really liked them and commisioned me to make one so she could use it instead of a heating pad for her TMJ. And since the rice bag has no plastic parts, it's a great way to reduce the footprint of an ailment. Here's what I created for her...


(The pictures taken on my jungle table cloth are of the rice bag before I filled it with some local popcorn rice.) I put some other little edible treats in the box too, because if you're going to pay for shipping, why not make it delicious, right?


Have you guys been creating or renovating anything this week?


Saturday, January 15, 2011

2010 Handmade Christmas Gifts III

    It is difficult to decide what to give people for Christmas. 
You know this.
I always appreciate the challenge, but as the family grows my brain gets more and more baffled by such decisions. Therefore, each of the gifts in this post was inspired by a blog I came across. Before I started planning Christmas gifts for 2010 I read a blog or two here and there, but once I realized how many ideas I would need to come up with I began intentionally (perhaps frantically) seeking out craft and sewing blogs to inspire me. As it turns out, the craft blog world is tightly interwoven, so once I found a few that had good ideas, they led me to others. The three family members listed here were the people I had the hardest time brainstorming for, but I am happy with how each of the projects turned out for them. Probably my greatest resources in discovering superb project ideas (besides google, of course) were the annual Sew Mama Sew Handmade Holidays gift idea lists.


 Projects #8 and 9 Hand warmers and Foot warmer for Micah


These rice filled hand warmers can be microwaved briefly, and then placed in your jacket pockets to keep your hands toasty. They are also good for soothing ear aches without making your whole face hot while you nap.
I followed the hand warmer tutorial on the blog no big dill, then made them a little fancier by adding stripes of 5 fabrics instead of choosing just one. These hand warmers will smell particularly good because they are filled with popcorn rice, a splendid local aromatic variety.


I used the same technique and designed a foot warmer bag, which will be nice for cold afternoons or nights. I chose to make it long and narrow so it can also be used to warm sore muscles, and especially sore necks. This one is filled with both rice and beans, but if you make one you could fill it with rice, beans, or even feed corn (like they did on no big dill with their foot warmers).


Projects #10 and 11 Flat Iron and Curling Iron Travel Cases for Megan


 I was really excited when I came across the tutorial for these hair iron travel cases (there actually are two there in the second picture). I think they are perfect to help my stylish younger sister travel neatly, without melting any hairspray bottles, or arriving at her destination to a knot of cords. As you can see I used the same combination of materials as I did on the art tote for my Mom, but I added navy bias tape to give it a little different spin. I found this tutorial on the blog Crap I've Made. It doesn't really have my favorite name, but I found some other interesting tutorials there, including rubber cement dyed eggs, and a fancy laptop sleeve.


Project #12 Charging Station for Gabe


This charging station is basically a pocket that hangs neatly on your phone or camera charger box while it is plugged in to the outlet. This is especially useful when the only available outlets are in hallways or other high-traffic locations where there are no places to set your phone, but you'd rather not put it on the floor. I found this pattern on the German blog sew-mad (I don't speak German, but she writes her blogs in both German and English). It was simple and fun to make because thick interfacing makes the station stiff enough to stand up on its own. The middle picture of it shows you that I used the button hole stitch to embroider the edge of the circle, which was the most time consuming part for me because Nathanael's Singer 15-91 from the 40's does automatic button holes. This means after every third of an inch I had to turn some knobs and readjust the fabric, which is why the stitches are a wee bit wiggly after my three times around the circle.  I was pretty excited when I was finished with this one...but I really liked the finished product so I might just make another.


I have a few gifts left to show you from Christmas 2010, so don't go too far!


Tuesday, January 11, 2011

2010 Handmade Christmas Gifts II

For the second instillation of Christmas gifts, I am proud to present you with...

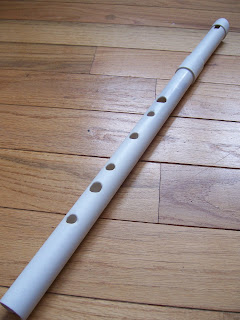
Project #5 Penny Whistle for Seth (made by Nathanael)

    
   This gift may be plain in appearance, but the sound it makes is magical. Nathanael and I had a hard time giving this one away; he because he loved playing it, and I because I was constantly serenaded from the moment he carved the last hole. In general I appreciate penny whistles, but the fact that he used a low D scale on this one allows for the most lovely music. The body of the whistle was constructed out of PVC, and the inside of the mouth piece (as you can see below) is made of wax infused pine. The top of the whistle is detachable so that you can create pipes that produce different scales, while using the same mouth piece (the most time consuming portion, especially considering the time to carve the wood and boil it in wax).


I hope he makes another soon.


 Project #6 Blue Jean Potholder for my Dad


 You may recall that we made some blue jean potholders last year as well. This year I made one for my Dad to match the Blue Jean Apron Nathanael made for him last year, and also because a heavy duty potholder always comes in handy. The design is modified from last year to allow more grasping flexibility (since the fabric is so thick), and to prevent any holes from forming where the thumb meets the hand...a very important area to protect...very very important.


During the gift exchange some people voted to add eyes and teeth to make it a shark.


But even plain, it can be stylish in all sorts of settings.
Project #7 Blue Jean Apron for Nathanael's Dad (made by Nathanael)


After last year's apron for my Dad came out so stunningly (sorry, we actually posses no pictures of that one, folks), we decided Nathanael's Dad would probably love one too. Nathanael composed this rugged apron out of a single pair of jeans, in a single day. He always amazes me. The strap pulls through the sides on the upper portion of the apron, creating a completely adjustable neckline without the need for knots, and all pockets remain intact for carrying small kitchen necessities.


Nathanael's Dad is taller and more broad shouldered, so it fits him quite nicely...if you think it looks silly on Nathanael you should see it on my short self.


 This is pretty much kitchen armor you are looking at.

Isn't he skilled?

Sunday, January 9, 2011

2010 Handmade Christmas Gifts I

Spending time with each of our families during the winter holidays was fantastic. Other than additional time with all of them, we really could not have wished for more.
  First, we spent the week surrounding Christmas with Nathanael's family in Wisconsin, where we got in a much appreciated dose of real winter. We went caroling, had some snowball fights, built a snowman (even though the snow was too cold to stick and we had to bring water out), went sledding, and appreciated the dog and chickens. On Christmas Eve the whole family sat around the table and made tamales, which were my favorite of our food of the holidays, however, delicious food was present in abundance..over abundance even. By the end of the week there were just too many delicious options available for indecisive individuals like myself.
  For the week around the lasts and firsts of the years 2010 and 2011 we were in New England with my family. We had the opportunity to go snowmobiling, see my older sister and brother-in-law's progress on their house, go to their New Year's Party, pick up their new dog with them (he's quite splendid), and go contra dancing with my good friend Lucy. We also saw the winter constellations and the Milky Way, which have always been visible at my parent's home, but look even more spectacular after having been away for a while.  Since Nathanael and I had been in Wisconsin on the 25th, my family delayed the Christmas celebration until after the New Year when we could all be there. I was so glad that Nathanael and I had finished all of our present making before we flew, and could just relax and look forward to being together and giving our fun gifts.


 Project #1 Colorful Art Tote for Asher


 Project #2 Floral Art Tote for my Mom


For the two of these I followed the Art Bag Tutorial on the blog From An Igloo, one of many blogs I discovered while I was searching for handmade gift ideas for our personality filled family. I changed the tutorial just slightly by turning what was supposed to be a ruler pocket into a brace to keep pencils or brushes flat. For Asher's I used three solid blends (blue, red and yellow) with 100% cotton bird fabric in the same colors to accent it, and I did my first covered button. For my Mom's I used two 100% cotton florals, which are some of my favorite fabrics that I have worked with, so you will be seeing this combination from me again. Both are padded with unbleached 100% cotton batting.

Projects #3 and 4 Turtles for my sister Melissa and Nathanael's Mom


 Those of you who have been reading for a while will recognize this, one of my first original patterns, from its premiere here in October. Since then I have added hand embroidered eyes and explored other fabric options. Melissa's has a body composed of a moss colored blend, and a 100% cotton shell (reversible, with opposite side unbleached muslin). Toni's has a body of yellow tie dyed 100% cotton and a shell similar to Melissa's, but dyed differently. Both are stuffed with unbleached 100% cotton batting.
    Now, you may ask yourself why I gave two grown women stuffed toys for Christmas. First, because they are amazing and the shells are reversible! Second, because in addition to the other Christmas presents, I had/have been making turtles like crazy because I hope to soon open an etsy shop! You can look forward to more news on that soon, but since my family members have been cheering on my sewing I thought they would enjoy a few of my first products.
(Ok, I admit we gave these two ladies other gifts too, like pecans we collected and granola we made.)

Next up I will show you the present I made for my Dad and two of the presents Nathanael made, so stay tuned!
  

Tuesday, October 12, 2010

I Like Turtles.


In my last post I mentioned having recycled a shredded pillowcase, so here is the second project salvaging some of that material. Since I was motivated to sew, I decided I would sew whatever I wanted, so after the clothespin bag I wanted to make a gift for one of the (many) babies soon to be born to my friends. Sewing projects for infants are common, but I wanted to make something that would not be grown out of too quickly. Inspired by the simplicity of uglydolls, which provide no choking hazards but are a little bit creepy, I decided upon a turtle. The list of patterns I have created on my own is very short...ok, this may be the first one, but much to my surprise it worked without a single problem! That is until the thin, old fabric tore as I was stuffing the turtle's little legs. I almost stopped then, to add it to my half completed projects and move on, but Nathanael told me to keep going. So, I patched the turtle's wounds, gave it some hand-sewn detail to compliment its roughness, and voila! The turtle prototype for my future baby gifts. I am actually kind of glad it ripped, because now I get to keep it and remember fondly how I purchased the pillow case at a yardsale before college (against the advice of people who told me it was a creepy thing to do).

   
 My finished turtle is about six and a half inches long.  He is made of 100% cotton, inside and out.

 
His solid green body used to be the base of the pillowcase and his colorblocked shell used to be the decorative edge fabric. I was not able to find such super fabrics at the fabric store this weekend, but I think future turtles will still turn out satisfactory and squishable.

And he comes out of his shell! Which is a completely inaccurate representation of turtles to young children, but so fun. I am sure I would have preferred this falsehood as a child.
What do you guys think?
Would your child / friend / younger-self approve of this toy?

Wednesday, October 6, 2010

Brightening Laundry Day


In September I read nine books, plus one with Nathanael. None of them were bad books, but neither did any of them live up to the expectations I had when I borrowed them from the library. This, and the fact that the refrigerator was packed with leftovers (and I am doing my best not to be addicted to cooking), prompted me to say to Nathanael on Sunday,"I am going to paint today." It was a nice idea. Unfortunately, the amazing and creative images that flash through my mind as I fall asleep dissipate before the afternoon; I was not able to think of a design for my canvas. Not wanting to waste my creative motivation, I decided to sew a clothes pin bag for myself. I needed one. No more carrying clothespins in my pockets.
 I went in search of a pattern and ended up finding a really neat design for a tear drop clothespin bag, which stays open on its own. For fabric I used a green pillow case that was torn to bits (never put a Euro pillow in a ~40yr old standard pillowcase), and some yellow floral fabric that I purchased a few years ago during a Joann Fabrics sale.
I am pretty excited about this bag.
First, because it looks really suave. I kind of want to find more uses for it and make another one. I would hang it on our door for full of candy for trick-or-treaters if there weren't danger of the first kid taking all of the candy. Secondly, because it was a really quick project and has inspired me to attempt to complete (or at least work on) a creative project each weekday. Third, because it is just one of a series of projects from my destroyed pillowcase, and I think you will enjoy seeing all of them in the days to come.

 If you want to make one of your own have a look at this pattern by Leisl . I think there is a printable pattern on there, but I just freehanded mine on a piece of packing paper. 


 Inside my extra long loop I put some braided string, just incase the old fabric would not stand up to the job.


This is the bag laid flat, before topstiching.


In action.


 The apartment clotheslines do not have hooks beside them, so Nathanael helped me devise a way to hang the bag from the clothesline itself. I think it's pretty nifty. I also plan to put a button on the back, to loop around for easier storage indoors, but I am still in search of the right button.

Related Posts Plugin for WordPress, Blogger...